Refrigeration equipment has become so firmly established in our lives that it is even difficult to imagine how we could manage without it. But classic refrigerant designs are not suitable for mobile use, for example, as a traveling cooler bag.
For this purpose, installations are used in which the operating principle is based on the Peltier effect. Let's briefly talk about this phenomenon.
What it is?
This term refers to a thermoelectric phenomenon discovered in 1834 by the French naturalist Jean-Charles Peltier. The essence of the effect is the release or absorption of heat in the area where dissimilar conductors through which electric current passes are in contact.
In accordance with the classical theory, there is the following explanation for the phenomenon: electric current transfers electrons between metals, which can accelerate or slow down their movement, depending on the contact potential difference in conductors made of different materials. Accordingly, with an increase in kinetic energy, it is converted into thermal energy.
On the second conductor, a reverse process is observed, requiring replenishment of energy, in accordance with the fundamental law of physics. This occurs due to thermal vibration, which causes cooling of the metal from which the second conductor is made.
Modern technologies make it possible to produce semiconductor elements-modules with maximum thermoelectric effect. It makes sense to briefly talk about their design.
Design and principle of operation
Modern modules are a structure consisting of two insulating plates (usually ceramic), with serially connected thermocouples located between them. A simplified diagram of such an element can be found in the figure below.

Designations:
- A – contacts for connecting to a power source;
- B – hot surface of the element;
- C – cold side;
- D – copper conductors;
- E – semiconductor based on p-junction;
- F – n-type semiconductor.
The design is made in such a way that each side of the module is in contact with either p-n or n-p junctions (depending on polarity). The p-n contacts are heated, the n-p contacts are cooled (see Fig. 3). Accordingly, a temperature difference (DT) occurs on the sides of the element. To an observer, this effect will look like a transfer of thermal energy between the sides of the module. It is noteworthy that changing the power polarity leads to a change in hot and cold surfaces.
 Rice. 3. A – hot side of the thermoelement, B – cold side
 Specifications
The characteristics of thermoelectric modules are described by the following parameters:
- cooling capacity (Q max), this characteristic is determined based on the maximum permissible current and the temperature difference between the sides of the module, measured in Watts;
- maximum temperature difference between the sides of the element (DT max), the parameter is given for ideal conditions, the unit of measurement is degrees;
- permissible current required to ensure maximum temperature difference – I max;
- the maximum voltage U max required for the current I max to reach the peak difference DT max ;
- internal resistance of the module – Resistance, indicated in Ohms;
- efficiency coefficient - COP (abbreviation from English - coefficient of performance), essentially this is the efficiency of the device, showing the ratio of cooling to power consumption. For inexpensive elements this parameter is in the range of 0.3-0.35, for more expensive models it approaches 0.5.
Marking
Let's look at how typical module markings are deciphered using the example of Figure 4.
 Figure 4. Peltier module marked TEC1-12706
 The marking is divided into three meaningful groups:
- Element designation. The first two letters are always unchanged (TE), indicating that this is a thermoelement. The next one indicates the size, there may be the letters “C” (standard) and “S” (small). The last number indicates how many layers (cascades) there are in the element.
- The number of thermocouples in the module shown in the photo is 127.
- The rated current is in Amperes, for us it is 6 A.
The markings of other models of the TEC1 series are read in the same way, for example: 12703, 12705, 12710, etc.
Application
Despite the rather low efficiency, thermoelectric elements are widely used in measuring, computing, and household appliances. Modules are an important operating element of the following devices:
- mobile refrigeration units;
- small generators to generate electricity;
- cooling systems in personal computers;
- coolers for cooling and heating water;
- dehumidifiers, etc.
Let us give detailed examples of the use of thermoelectric modules.
Refrigerator using Peltier elements
Thermoelectric refrigeration units are significantly inferior in performance to compressor and absorption analogues. But they have significant advantages, which makes their use advisable under certain conditions. These advantages include:
- simplicity of design;
- vibration resistance;
- absence of moving elements (except for the fan blowing the radiator);
- low noise level;
- small dimensions;
- ability to work in any position;
- long service life;
- low energy consumption.
These characteristics are ideal for mobile installations.

Peltier element as an electricity generator
Thermoelectric modules can work as electricity generators if one of their sides is subjected to forced heating. The greater the temperature difference between the sides, the higher the current generated by the source. Unfortunately, the maximum temperature for the thermal generator is limited; it cannot be higher than the melting point of the solder used in the module. Violation of this condition will lead to failure of the element.
For mass production of thermal generators, special modules with refractory solder are used; they can be heated to a temperature of 300°C. In ordinary elements, for example, TEC1 12715, the limit is 150 degrees.
Since the efficiency of such devices is low, they are used only in cases where it is not possible to use a more efficient source of electrical energy. However, 5-10 W thermal generators are in demand among tourists, geologists and residents of remote areas. Large and powerful stationary installations powered by high-temperature fuel are used to power gas distribution units, meteorological station equipment, etc.

To cool the processor
Relatively recently, these modules began to be used in CPU cooling systems of personal computers. Considering the low efficiency of thermoelements, the benefits of such structures are rather doubtful. For example, to cool a heat source with a power of 100-170 W (corresponding to most modern CPU models), you will need to spend 400-680 W, which requires installing a powerful power supply.
The second pitfall is that an unloaded processor will release less thermal energy, and the module can cool it below the dew point. As a result, condensation will begin to form, which is guaranteed to damage the electronics.
Those who decide to create such a system on their own will need to carry out a series of calculations to select the power of the module for a specific processor model.
Based on the above, using these modules as a CPU cooling system is not cost-effective; in addition, they can cause computer equipment to fail.
The situation is completely different with hybrid devices, where thermal modules are used in conjunction with water or air cooling.

Hybrid cooling systems have proven their effectiveness, but the high cost limits the circle of their admirers.
Air conditioner based on Peltier elements
Theoretically, such a device will be structurally much simpler than classic climate control systems, but it all comes down to low performance. It’s one thing to cool a small volume of a refrigerator, another thing to cool a room or the interior of a car. Air conditioners using thermoelectric modules will consume more electricity (3-4 times) than equipment running on refrigerant.
As for using it as a car climate control system, the power of a standard generator will not be enough to operate such a device. Replacing it with more efficient equipment will lead to significant fuel consumption, which is not cost-effective.
In thematic forums, discussions on this topic periodically arise and various home-made designs are considered, but a full-fledged working prototype has not yet been created (not counting the air conditioner for a hamster). It is quite possible that the situation will change when modules with more acceptable efficiency become widely available.
For cooling water
The thermoelectric element is often used as a coolant for water coolers. The design includes: a cooling module, a thermostat-controlled controller and a heater. This implementation is much simpler and cheaper than a compressor circuit; in addition, it is more reliable and easier to operate. But there are also certain disadvantages:
- water does not cool below 10-12°C;
- cooling takes longer than its compressor counterpart, therefore, such a cooler is not suitable for an office with a large number of employees;
- the device is sensitive to external temperature, in a warm room the water will not cool to the minimum temperature;
- Installation in dusty rooms is not recommended, as the fan may become clogged and the cooling module may fail.
 Tabletop water cooler using Peltier element
 Air dryer based on Peltier elements
Unlike an air conditioner, the implementation of a dehumidifier using thermoelectric elements is quite possible. The design is quite simple and inexpensive. The cooling module lowers the temperature of the radiator below the dew point, as a result, moisture contained in the air passing through the device settles on it. The settled water is discharged into a special storage tank.
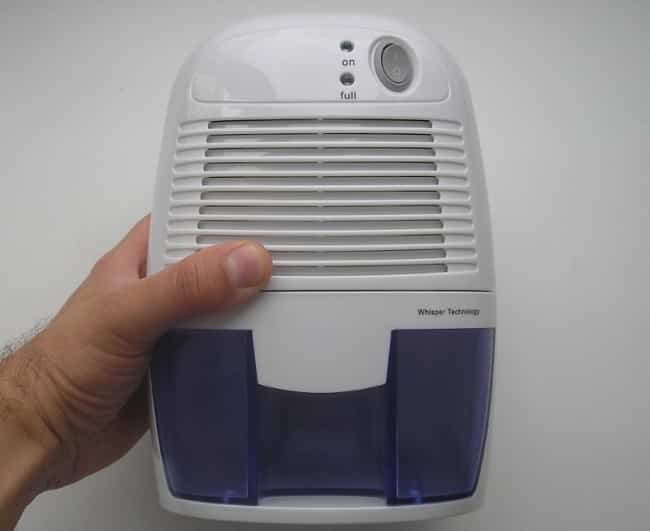
Despite the low efficiency, in this case the efficiency of the device is quite satisfactory.
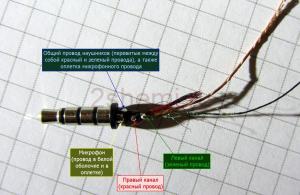
How to connect?
There will be no problems connecting the module; a constant voltage must be applied to the output wires; its value is indicated in the datasheet of the element. The red wire must be connected to the positive, the black wire to the negative. Attention! Reversing the polarity reverses the positions of the cooled and heated surfaces.
How to check the Peltier element for functionality?
The simplest and most reliable method is tactile. It is necessary to connect the module to the appropriate voltage source and touch its different sides. For a working element, one of them will be warmer, the other colder.
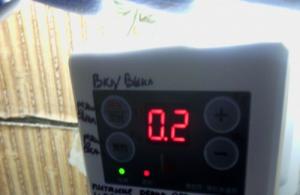
If you don’t have a suitable source at hand, you will need a multimeter and a lighter. The verification process is quite simple:
- connect the probes to the module terminals;
- bring the lit lighter to one of the sides;
- We observe the readings of the device.
In the working module, when one of the sides is heated, an electric current is generated, which will be displayed on the device display.
How to make a Peltier element with your own hands?
It is almost impossible to make a homemade module at home, especially since there is no point in doing so, given their relatively low cost (about $4-$10). But you can assemble a device that will be useful on a hike, for example, a thermoelectric generator.

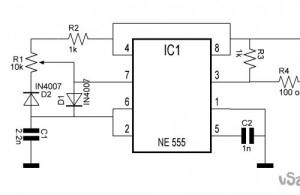
To stabilize the voltage, it is necessary to assemble a simple converter on the L6920 IC chip.

The input of such a converter is supplied with a voltage in the range of 0.8-5.5 V, and at the output it will produce a stable 5 V, which is quite enough to recharge most mobile devices. If a conventional Peltier element is used, it is necessary to limit the operating temperature range of the heated side to 150 °C. To avoid the hassle of tracking, it is better to use a pot of boiling water as a heat source. In this case, the element is guaranteed not to heat above 100 °C.
Using simple devices, you can use heat loss from heating air or liquids. In this article we will tell you how to use the waste energy of stoves, boilers and open fires, converting it into a direct electric current of low strength.
Any chemical process occurs with the release of various types of energy. Such a powerful source as combustion has been used at all times. It can be called the primary source of heat and light. Almost all substances on Earth burn, releasing heat and light in different quantities. Converting thermal energy into electrical energy is not difficult if you have a working steam turbine at hand, similar to those installed in thermal power plants. This is a bulky and complex device that is unlikely to find a place in the boiler room of a country house. We will try to benefit from the heat generated by stove heating or heating water.
The Peltier effect is a phenomenon of temperature difference when thermocouples of two different types of conductors (p-type and n-type) interact when a direct current passes through them. The Seebeck effect is a consequence of the Peltier effect, when an electric current is generated when one of the thermocouples is heated. We will not describe in detail the thermodynamics of the process - this difficult-to-understand information can be easily found in reference literature. We are interested in the result and options for its practical use.
Thermoelectric module design
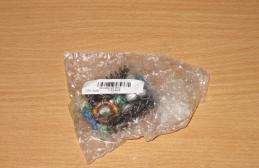
A thermoelectric module (TEM) consists of many thermocouples connected to each other by a copper plate. The thermocouple field is glued between two ceramic plates. It is possible to assemble such a module only in a factory environment. But you can also assemble several TEMs for your own needs at home. Peltier-Seebeck elements are available for free sale in specialized stores (and on websites) selling technological equipment.
Assembling a 5 V TEM
What you will need:
- Peltier module TEC1-12705 (40x40) - 2 pcs.;
- boost DC voltage converter EK-1674;
- duralumin sheet 3 mm thick;
- a water container with a perfectly flat bottom (ladle);
- hot glue;
- soldering iron

We cut out two identical plates from a sheet of duralumin, slightly larger than two modules lying next to each other. We strengthen the plates on the modules on both sides with hot glue. We fix (with hot glue) the resulting “sandwich” to the bottom of the ladle. This design can already be put on fire, but we will get a useless 1.5 V at the output. To improve the performance, we need a boost converter, which we solder into the circuit. It will increase the voltage to 5 V, and this is already enough to charge a mobile phone.

Attention! The converter has dimensions of 1.5x1.5 cm. If you do not have professional skills, entrust soldering to a specialist.
The temperature difference in our design is obtained by heating one side (from the furnace or flame) and cooling the other (water in the ladle). Of course, the greater the difference, the more efficient the module is. Therefore, to operate in microgenerator mode, you will need a relatively low water temperature in the ladle (it is better to replace it periodically). To generate the coveted 5 V, it is enough to place the structure on a glass with a burning candle.
By proportionally combining more modules, we get a more efficient energy generation system. Accordingly, by increasing the structure, we proportionally increase the heat exchanger. In this case, the surface to be cooled should be completely covered with a container of water (the simplest and most affordable option).
Everything is so simple that you immediately feel the desire to assemble more modules into one system and generate 220 V from the fire. And then connect the oil heater or air conditioner. Such a simple system has its drawbacks, and the main one is low efficiency. Typically this figure does not exceed 5%. This results in a relatively low current of 0.5 - 0.8 A and very low power - up to 4 W.
For a pump or incandescent lamp this is negligible, but quite enough for:
- charging batteries up to motorcycle batteries (in variants proportional to the requirements);
- operation of light-emitting diode (LED) lamps;
- radio receiver
In winter, a system placed on a heat source located outside will work as efficiently as possible.
Material costs for assembling a 5V thermoelectric microgenerator:
*- this element model was chosen for price reasons. The range of TEMs from supplier companies is quite wide, which allows you to select more productive (up to 8 V) models (they are significantly more expensive).
Factory-made products of this design are just beginning to appear on sale. Serial production is carried out in small batches, and the range is small. The cost of such a “bucket” starts at 2,500 rubles.

A factory thermal generator is a device based on the Peltier-Seebeck effect, which can be attached directly to a heated surface. It is distinguished from the design described above by its factory execution (and therefore reliability), the absence of a liquid heat exchanger (instead there are fins for air cooling) and a higher price.

A standard “travelling” thermogenerator has the following characteristics:
As can be seen from the table, factory reliability and utility are not cheap. However, it cannot be said that it is functionally superior to the homemade version with a bucket. An impressive 13.5 V will speed up charging your mobile phone, but for this you will need to carry 2 kg of weight with you on a hike, and this is an unaffordable luxury (considering the size of the device). And, of course, the price makes you think. With this amount, you can assemble not a “thermal ladle”, but a “thermal pan” and easily charge your laptop. And one more nuance - the device still requires fastening to a metal plate if an open fire is used.
Overall, this is a nice and convenient addition for those who have no problems with money and free space in the trunk.
Energy furnace
Today, the energy furnace is the apotheosis of the use of TEMs in everyday life. This is a factory product, essentially a “potbelly stove” firebox for any type of solid fuel with an integrated thermoelectric module. An ideal option for hunting lodges, summer cottages, remote winter quarters and generally any type of life away from civilization. Designed for autonomous use (without peripheral heat sinks), it has only a hearth and a chimney. Includes food preparation. The most powerful Peltier-Seebeck elements are installed on this furnace.

Characteristics of energy furnaces:
Although the stove is portable, it is certainly a “super heavyweight” among household appliances. However, the range of tasks for an energy furnace is quite wide - it can even charge car batteries and illuminate entire rooms with LED lamps. There is a place for it in an expeditionary convoy and in a hunting all-terrain vehicle, in a technical room and in the country. In other words, in this case we always have the heat source with us, all we have to do is find fuel.
In its niche, the energy furnace is indispensable, although the service life declared by the manufacturer is a little alarming - 10 years. It should be noted that, as in a thermogenerator, there is the possibility of preventive (or emergency) replacement of all parts down to the housing.
Thermoelectric modules are extremely interesting objects. In addition to the application methods described, they are also used for water and air conditioning. At the same time, direct current is supplied to the same element and it works “in the opposite direction” - it cools the air. This technology is successfully used in automobile air conditioners and water coolers, in the automotive industry and in the production of microprocessors. We will describe these devices in the next article.
Vitaly Dolbinov, rmnt.ru
Ecology of knowledge. Peltier elements are such small (usually 4x4 cm) gizmos, consisting of ceramic plates and a bimetal between them, through which, when one is heated,
We will talk about a temperature generator based on Peltier elements.
Peltier elements are such small (usually 4x4 cm) gizmos, consisting of ceramic plates and a bimetal between them, through which an electric current is generated when one side is heated and the other is cooled. Or vice versa, by applying current, we heat one side and cool the other. This property of Peltier elements is used in the manufacture of portable refrigerators, but I am primarily interested in the generating ability of these devices.
Indeed, very convenient. You heat one side of the element, cool the other, and you get enough current and voltage to charge, for example, a cell phone or other electronic devices. I generally have trouble with electricity, it doesn’t happen often, so I need such a thing vitally. No, of course, solar panels can partially solve the problem of lack of electricity. This, at this stage, I generally consider one of the best sources of alternative energy. Therefore, I also have a solar battery (which I’ll talk about later), small, but sufficiently powerful for me. It produces somewhere between 1 and 1.5 amperes at a voltage of 5 to 15 volts.
But the sun is not always there, so the thermogenerator turned out to be more necessary. Yes, even outside civilization it is necessary, and I think survivalists are also interested in such things.
To create a thermogenerator, not all Peltier elements are suitable, but only those that maintain a temperature of 300-400 degrees. Of course, it is possible to make a generator from ordinary elements, those used in refrigerators, but only as an experiment. Because as soon as you overheat, the element will fail. You can purchase high-temperature elements from the Americans or the Chinese.
You can purchase elements from your compatriots, but at a fabulous price, and this is not our way.
So my thermogenerator is heated by an oil burner (using regular, cheapest sunflower oil).
Which is placed in such a collapsible housing, consisting of a tin can, a burner height regulator and the Peltier element itself.

The burner itself also consists of a can and a charcoal wick.

You can make such a wick using this video instruction.
Personally, I make such wicks from coals from a fire; advanced residents of large cities can simply buy charcoal in a store. Such a burner is good in itself; it can be used as a source of lighting, instead of candles. It doesn’t take much oil to work, it doesn’t smoke much, and it can burn for days.
This is a Peltier element; a radiator for cooling a computer processor, with a fan, is placed on top of it.

This is the burner fire level regulator. I made it from a dead CD-rom. It can be made from anything, as long as your imagination works.

I have a Peltier element (in this version, two or three elements, on top of each other, all lubricated with thermal paste) sandwiched between a cooling radiator and a heating radiator.

I filled the space around the element with rubber (from the heels of unnecessary shoes) and glued it all together with automotive heat sealant.

The cooling fan was made from a 3-volt motor from the same faulty CD-rom and the blades of a standard fan from a computer cooler. The engine and fan were connected using Chinese superglue and a disk holder from the same CD-rom. The result is a cooling fan that starts running at one and a half volts and consumes very little current.

For the heating radiator, I took a radiator from an old processor cooler.

The voltage, about 6-8 volts, goes to the converter, where it decreases to the five volts needed for the devices.

I have already written about this converter. http://tutankanara.livejournal.com/410005.html

Here is the assembled generator itself. As soon as (within a minute or two) the generated voltage reaches one and a half volts, the cooling fan begins to spin, and the cold side of the element begins to cool. The thermogenerator enters operating mode within a few minutes. It can power LED garlands and charge electronic devices. My generator produces about 400 milliamps of current at 5 volts. The current strength depends on the element used. If possible, I will put better elements.

Also, this device, if you remove the generator part, can be used as a regular burner for boiling water. I usually fill the jar halfway and it boils within 10-15 minutes. published
Thermoelectric Peltier generator is based on the so-called "Peltier effect", which was discovered by scientists in 1834. It lies in the fact that when electric current is passed in a closed circuit, which consists of two connected plates (metal or semiconductor), a temperature difference will arise in them. That is, one element will heat up, and the second will cool. The opposite effect was discovered even earlier by the German scientist Seebeck. It can be formulated as follows: in a closed circuit of two conductors, the contacts of which have different temperatures, a current arises.
Actually, we are interested in just the last option, using which we will receive current. So, perhaps, it would be more correct to talk about a Peltier-Seebeck thermoelectric generator.
It is immediately worth noting that the efficiency of such a generator is very low. And you can hardly expect that the energy received will be enough for anything more than charging a phone or running a light bulb. But for tourists and just enthusiasts this is enough.
Various designs can be used to generate current. The simplest is a “mug”, part of which is heated by fire, and the second is cooled by water. We will look at 3 Peltier thermoelectric generators.
For this we need:
- Peltier module. We recommend TEC1-12712. Please note that this module is available in three versions: 40x40, 50x50, 60x60. The larger the size, the higher the cost (approximately 1000-2000 rubles). We will need either 1 module measuring 60x60 or higher, or 2 modules measuring 40x40. The first 3 digits are the number of elements (127). The last two digits in the marking are the maximum current. In our case - 12A.
- Boost converter constant voltage (up to 5V). In most cases, we will need a current with a voltage of 5V. This is enough to charge a phone, flashlight, radio and run a regular incandescent lamp. But our generator will most likely produce a lower voltage current. It is necessary to measure it and add the appropriate converter to the system. They can be either domestically produced - KR1446PN1 (or KR1446PN1E); boost converter 3.3B/5B EK-1674. So and imported - 5V NCP1402; MAX 756. Their prices may vary significantly, but with a little searching, you can buy a suitable converter for less than $10. The output of the converter depends on what the Peltier thermogenerator will be used for. If for charging a mobile phone - a USB connector, etc.
- A heating element. The simplest one is a fire. Alternatively, you can use candles (you will just need to adjust the generator as the candle melts). The principle here is simple - you need to transfer as much heat as possible to the Peltier module. Therefore, the source must be either very hot - the fire of a gas stove, a fire. Or heat loss needs to be minimized. To do this, the heating element can be placed in a glass or box. Below we will dwell on this in more detail.
- Cooling element. The simplest is water or dry ice. If you are near a river, you can try using cold water. In this case, the heating element will be on top.
We've covered the theory, now it's time for practice.
We just have to select the last element - the connecting elements. Their task is to create the maximum temperature difference between the plates of the Peltier module. There is room for your imagination to run wild here, and a lot depends on where, how and why you assemble the Peltier generator, so we will simply give examples.
Example 1. Two metal mugs of different sizes with sawed off handles. You can take a ladle or a small saucepan. We put the pan on the fire (you can also use an electric stove), put the module on top and cover it with a smaller mug or ladle filled with ice, snow or just cold water. Next, we solder a wire to the output of the generator that leads to the input of the voltage converter. Before this, the surfaces, of course, need to be polished. You should also apply thermal paste; this will be discussed in more detail below.
Example 2. We will need an Ikea candle, a cup, a ladle and a duralumin plate. Using heat-resistant glue, glue the Peltier module to the plate. On the other side of the module we also glue the bottom of the ladle.
Example 3. We take a module with 127 elements, dimensions 50x50. You will also need two aluminum bars, the contact surfaces of which we pre-polish and apply thermal paste. We glue the bars on both sides of the module. We attach a radiator to the “cold” block. And we put the “hot” one on a working burner of the electric stove.

The power of this monster was enough to light a 10-watt light bulb with a voltage of up to 6V.
The disadvantage of all previous options is that it is difficult to organize effective cooling at home. The ice will melt and the radiator will heat up. But in “wild” conditions everything can be simpler: you can use river water or snow for cooling, and the fire mentioned above for heating.
Important! The efficiency of the Peltier generator is very low, so every opportunity should be used to improve the efficiency. All of them, one way or another, are aimed at reducing heat loss.
Firstly, for better thermal conductivity, the surface of the connecting elements that is in contact with the module must be polished to a mirror finish. To do this, you can use a machine or drill with a felt wad inserted, onto which GOI paste is applied.
Then they should be coated with thermal paste, which conducts heat well. You can get it at any radio or computer store.
You can also apply a heat-resistant sealant to the places through which heat escapes. In our first design, this will be the space between the bottoms of the larger ladle and the smaller mug. Thanks to this, the resulting heat will not “dissipate” over the entire surface of the bottom of the outer mug. This is not necessary if your bottoms are approximately the same size, as shown in the photo below.

Both the cup and the ladle are approximately the same diameter - all the heat from the cup goes upward to the Peltier module.
If the wires between the module and the converter are in a “hot zone”, they should also be insulated with heat-resistant sealant or cloth.
The resulting current can be measured with a tester, LED, low-power light bulb, etc. Note that the current does not appear immediately after startup, but after 1-2 minutes.
Continuing the topic of homemade devices.
This time we will talk about a temperature generator based on Peltier elements.
Peltier elements are small (usually 4x4 cm) gizmos consisting of ceramic plates and a bimetal between them, through which an electric current is generated when one side is heated and the other is cooled. Or vice versa, by applying current, we heat one side and cool the other. This property of Peltier elements is used in the manufacture of portable refrigerators, but I am primarily interested in the generating ability of these devices.
Indeed, very convenient. You heat one side of the element, cool the other - and you get enough current and voltage to charge, for example, a cell phone or other electronic devices. I generally have trouble with electricity, it doesn’t happen often, so I need such a thing vitally. No, of course, solar panels can partially solve the problem of lack of electricity. This, at this stage, I generally consider one of the best sources of alternative energy. Therefore, I also have a solar battery (which I’ll talk about later), small, but sufficiently powerful for me. It produces somewhere between 1 and 1.5 amperes at a voltage of 5 to 15 volts.
But the sun is not always there, so the thermogenerator turned out to be more necessary. Yes, even outside civilization it is necessary, and I think survivalists are also interested in such things.
To create a thermogenerator, not all Peltier elements are suitable, but only those that maintain a temperature of 300-400 degrees. Of course, it is possible to make a generator from ordinary elements, those used in refrigerators, but only as an experiment. Because as soon as you overheat, the element will fail. You can purchase high-temperature elements from the Americans or the Chinese. (A small digression about the Chinese: reading my blog, you may get the wrong idea that I have a bad attitude towards China or the Chinese. Quite the contrary, I admire China, which does not prevent me from believing that this is our most likely enemy. Again, the Germans too when -they were our enemy, and the French, and whoever was not. And so what? If there is a war, we will hate, but as long as there is peace, we are friends. Moreover, everything will end in the end, as was previously the case with other nations. And after all the wars, the Russians and the Chinese will become brothers forever. Amen.)
You can purchase elements from your compatriots, but at a fabulous price, and this is not our way.
So my thermogenerator is heated by an oil burner (using regular, cheapest sunflower oil).
Which is placed in such a collapsible housing, consisting of a tin can, a burner height regulator and the Peltier element itself.

The burner itself also consists of a can and a charcoal wick.

You can make such a wick using this video instruction.
Personally, I make such wicks from coals from a fire; advanced residents of large cities can simply buy charcoal in a store. Such a burner is good in itself; it can be used as a source of lighting, instead of candles. It doesn’t take much oil to work, it doesn’t smoke much, and it can burn for days.
This is a Peltier element; a radiator for cooling a computer processor, with a fan, is placed on top of it.

This is the burner fire level regulator. I made it from a dead CD-rom. It can be made from anything, as long as your imagination works.

I have a Peltier element (in this version, two or three elements, on top of each other, all lubricated with thermal paste) sandwiched between a cooling radiator and a heating radiator.

I filled the space around the element with rubber (from the heels of unnecessary shoes) and glued it all together with automotive heat sealant.

The cooling fan was made from a 3-volt motor from the same faulty CD-rom and the blades of a standard fan from a computer cooler. The engine and fan were connected using Chinese superglue and a disk holder from the same CD-rom. The result is a cooling fan that starts running at one and a half volts and consumes very little current.

For the heating radiator, I took a radiator from an old processor cooler.

The voltage, about 6-8 volts, goes to the converter, where it decreases to the five volts needed for the devices.

I have already written about this converter.

Here is the assembled generator itself. As soon as (within a minute or two) the generated voltage reaches one and a half volts, the cooling fan begins to spin, and the cold side of the element begins to cool. The thermogenerator enters operating mode within a few minutes. It can power LED garlands and charge electronic devices. My generator produces about 400 milliamps of current at 5 volts. The current strength depends on the element used. If possible, I will put better elements.

Also, this device, if you remove the generator part, can be used as a regular burner for boiling water. I usually fill the jar halfway and it boils within 10-15 minutes.