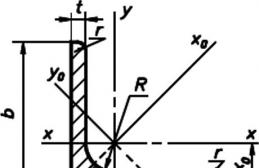
Stainless steel sheet construction
Despite the huge variety of types and models of boiler equipment, the desire to make a heating device on their own, with their own hands, does not leave Russian “homemade” people. Even the fact that a home-made electric boiler, in case of errors during design and installation, can become a source of serious danger does not stop home craftsmen. Let's look at how you can make an inexpensive and safe boiler with your own hands.
Electric and solid fuel
There are several types of boiler equipment, differing primarily in the type of fuel used. The most popular are:
- Electric.
- Solid fuel (pellet) boiler.
- Gas equipment.
Pellet
Despite the fact that in recent years there has been almost universal gasification, gas-powered equipment is still rarely installed in rural areas. Its main area of application is city apartments and country cottages, which are close in terms of living comfort to the conditions of a metropolis. In villages, solid fuel equipment is more often installed - a wood, pellet or coal boiler.
The most important advantage that distinguishes a solid fuel (pellet or wood) heating boiler is its low cost and ease of operation. In rural areas, firewood remains the cheapest fuel to this day, and the likelihood of supplying gas to remote corners of the country is still almost a fantasy.
Electric
An electric heating boiler has a lot of advantages, but all of them are covered by one significant disadvantage - high operating cost. In some ways, the following can also be considered disadvantages of the equipment:
- Volatility of the system. A power outage will have negative consequences for the entire heating network, and not just for the device itself. To minimize the risk of the system defrosting in the event of a power outage, an additional emergency generator will be required.
- The electrical network must be able to withstand significantly increased load. An additional line may be required. You will definitely need to install a separate machine.
- The device must be connected by a qualified electrician. Unprofessional installation is life-threatening.
According to the principle of operation, electrode and heating element electric boilers are distinguished. We will not dwell on the former, since it is extremely difficult to design and install such a device. Let's take a closer look at heating elements devices.
Heating in such a boiler is carried out in a tubular heater. From it, heat is transferred to the coolant circulating in the system. You can pump water or antifreeze as a coolant.
DIY heating element boiler
Differences between heating elements and inductionFor an electric heating boiler, the heating element is the main element. Without it, it is impossible to convert electrical energy into thermal energy. The heating element is placed in the housing and connected to regulators, sensors, control boards and other additional components designed to facilitate the operation of the equipment.
If there is a system in the house with a pipeline with thick walls, the heating element can be installed directly into it. The pipe will act as a housing. This design has a number of disadvantages, but it has a right to exist. Very often, heating elements are installed in the heating system as an emergency source of thermal energy. If the main boiler stops working for any reason, you can simply connect a heating element that will heat the coolant. Depending on the specific situation, the heating element can heat the water to a minimum temperature in order to prevent only the system from defrosting, or it can operate at full capacity, providing heat to the entire house.
Another common design is the option with a removable pipe. In general, it is similar to the previous version, but allows you to quickly remove and replace the heating element in case of failure, the need for repair, etc. This design is more complicated to manufacture, but compared to the previous one, it is universal.
A little more complicated...
 Drawing of a homemade boiler
 Despite the availability of alternative ways to use electricity in heating systems, the best option is still a full-fledged boiler. The boiler body is best made of steel. This choice is justified from the point of view of safety, durability of the structure, and ease of manufacture. You can create a housing using a conventional welding machine. Such work will not require any serious special skills.
You should not make the case large. The more compact the dimensions of the boiler, the more efficiently it works. What to do if the house is large and you need a unit whose power will allow you to heat a large amount of water? Refuse the electric boiler in favor of another type of equipment. Electric appliances are suitable for heating a small country house, but when heating large cottages they will not be the best choice.
The body can have any shape, but it must be hermetically sealed on both sides. There are two holes on both sides. Through one, the coolant is supplied to the system, through the other, cooled water enters the boiler.
heating element
 Types of heating elements
 The biggest difficulty in making an electric heating boiler is choosing the right heating element. Its power should be enough to heat the coolant and water in the hot water system (if necessary, its arrangement). The power is selected based on the calculations performed. When designing a hot water supply system, it is better to choose a heating element with high power ratings.
The heating element is installed in the housing on the bottom cover, opposite the hole through which cooled coolant is supplied to the heater. It is worth installing shut-off valves in the pipeline next to the boiler to ensure the maintainability of the device. Shut-off valves will allow you to turn off the boiler if necessary without draining water from the system. As a rule, heating systems with an electric boiler are made with forced circulation, which will also require connecting pumping equipment.
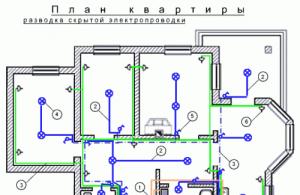
Electrical panel
The operation of electrical equipment is ensured by energy from the electrical network. To connect a homemade device to the latter, you will need to construct an electrical panel. You will definitely need to connect a three-phase input. It is better to entrust this part of the work to a qualified electrician, since the cost of an error is disproportionately high.
A starter, automation, relays, and electrical appliance control elements are installed in a metal panel. The system must be grounded. The effectiveness of grounding should be checked annually by employees of specialized organizations. The data obtained by measurements must be recorded in the protocol. The simplest way to perform grounding is as follows. Under the floor there is a structure made of a bolt welded to a metal pin. An electrical wire coming from the switchboard is screwed to the bolt. As you can see, everything is simple.
 Factory electrical panel
 The electrical circuit of the device will include the following elements:
- Machine.
- Magnetic switch.
- Control buttons.
- Toggle switch and relay.
- Circuit breakers.
- Thermal sensors.
- Additional automation (if necessary).
After connecting to the power supply, you can start the boiler for the first time and test the system.
Conclusion
As you can see, making an electric boiler with your own hands is not at all difficult. In fact, the help of a specialist will only be required when installing an electrical panel. All other work can be easily done independently and does not require any special skills. Despite the simplicity of the work, experts recommend not to experiment and purchase a ready-made industrial model. It is not difficult to choose a suitable option, including in terms of price, but the reliability and safety of such structures is many times higher than “homemade” ones.
Related PostsHeating the house using electricity- the most technologically advanced option. Electrical energy is converted into heat without loss and is conveniently and cheaply transported.
There are a number of standard solutions for organizing heating - heat pumps, reverse air conditioners, ceramic infrared emitters, convectors, electric boilers. Installing an electric boiler is popular.
Electric boiler for heating a house
Advantages of installing an electric central heater:

- Application other types of fuel in parallel with electricity.
- Possibility to embed in existing heating system.
- Saving on heaters.
- Simplicity designs and maintainability.
- Saving in the presence of differentiated heating tariffs.
- Low equipment cost, possibility of remote control.
- Availability technology, the ability to assemble a heater with your own hands.
- Possibility of installation in a heating system private house and outbuildings.
- The optimal solution in the presence of alternative energy sources: solar panel or wind generator.
Electric boiler design
There are various methods for implementing an electric boiler, but each one contains three components:
- Heater.
- Frame.
- Management and Security Group.
Differences in electric boilers are usually variations of these parameters and options.
How does it work

The device is connected to liquid heating system. The system is filled with coolant, which is heated by a heating element. A pump or gravity constantly forces the fluid to circulate.
The liquid transfers heat to the room through heat exchangers - batteries. The cold liquid is supplied again to the boiler.
For highways or sensors are installed at certain points in the room. They send a signal to the controller, which reduces or increases the voltage or turns off the boiler.
Electric boiler control depending on connection diagrams and the components used are stepwise or smooth.
The selection of heater power depends on the size of the heater tank and the power of the radiators. Installing too powerful heaters can lead to boiling of the coolant and rupture of the system.
Attention! To increase safety, use the maximum mechanical thermostat with relay, which will prevent the liquid from boiling if the controller electronics fail to cope.
Network connection and control unit
To connect to the network securely you will need:

- Wires of the appropriate section. The cross section is calculated based on power and length; for a powerful system it is better to connect the power cable and 380 volts.
- Grounding: metal parts should be connected to the ground loop.
- Separate difavtomat— will turn off the consumer if the protective tube rusts and “pierces” into the house.
To regulate the current, purchase:
- Controller or control unit.
- Ammeter.
- GPS module.
- Mechanical valve, which turns off the electricity when the liquid boils in the boiler (reliable mechanism, operates on pressure).
Schemes of homemade electric boilers
A home craftsman can easily assemble an electric heater in his workshop. There are a number of schemes and solutions that are optimal for various conditions.
From a cast iron battery with TEN
If you plan to heat a small insulated room (house, garage, isolated room), a cheap option would be to convert cast iron battery into an electric heater. This option acts as an electric boiler and heat exchanger.
For assembly you will need:

The heating element is installed in the bottom plug of the battery. If the battery is isolated, the opposite plugs are plugged, and above the heating element the plug crashes into additional expansion tank, which also serves as a “watering can” for filling and deflating the battery.
If the battery will serve as an electric boiler, the cold water supply is connected to the opposite side of the battery at the bottom, and the cold water supply is connected to the top of the battery.
During installation, be sure to follow the rules for safe installation of electrical wiring.
Attention! With a small cross-section of wires, uninsulated twists or weak contacts, there is fire risk.
You might also be interested in:
From the pipe
There are the following types of electric boilers made from pipes.

Induction
Works on the principle of electromagnetic induction.
Placed inside a plastic pipe metal pin.
A spiral of thick copper wire is wound through the dielectric from above.
A direct current is supplied to the wire, the core heats up and transfers the temperature to the flowing coolant.
With thermal electric heaters
The simplest boiler can be assembled from a thick-walled metal pipe or a 10-kilogram fire extinguisher. The heater in this system is a regular heating element. It consists of a heated nichrome coil immersed in a heat transfer core and a waterproofing shell. TEN, in fact, household boiler.
The heating element is installed both at the bottom and at the top of the tank. Heater coils can be easily inserted and removed without welding, as the service life heating coils limited, they will need to be changed periodically. When current passes, the heater filament becomes hot and heats the water.
If more power is required, you can assemble instantaneous combi boiler from several blocks connected by jumpers.
Electrode boiler

The essence of the operation of an electrode boiler is the principle electrolysis. The boiler consists of a tube - a body, inside of which a metal pin is lowered through a dielectric gasket. The housing is connected to the “zero” phase and grounded.
On one side of the housing there is a cold water supply, on the other there is a heated water outlet. An important element is the coolant; certain additives are added to it.
The water is heated by movement of electrons between the anode and cathode.
Do-it-yourself electrode boiler potential danger. The heating system in this case is an element of the electrical circuit. If the ground wire is damaged for some reason, the system becomes dangerous - if you touch the housing, you can get an electric shock.
DIY making
The construction of the boiler consists of two stages - design and assembly.
Design and preparation of drawing

At the design stage the following is determined:
- Type of boiler. The difference in boiler efficiency is small, so it is better to choose a heating element circuit that has been proven over the years.
- Boiler power. It is determined by the sum of the power of the heaters and depends on the heat loss of the room, as well as the thermal power of the batteries.
- General scheme and draw a project.
Assembly
Assembly consists of several stages.
Search and preparation
For our design we will need pipe cut 150 mm in diameter, two plugs, electric heaters, fittings for coolant inlet/outlet, connection of heaters and air vent valve.
Material processing
Pipe required hermetically sealed brew, connect the fittings. To do this, we turn to familiar welders. The task is made easier if you have a fire extinguisher housing - it is made of corrosion-resistant steel, the thickness and dimensions are quite suitable. All that remains is to weld threaded connections.
Final assembly
To assemble an electric boiler, we will need:
- Tools: adjustable and open-end plumbing wrenches, screwdriver and electricity indicator.
- Consumables: sealing gaskets, linen tow or fum tape.
The assembly proceeds in logical steps:

- Connecting heating elements to the housing. It is advisable that they be located in the lower part - this way the heating will be more uniform.
- Wall mounting. To do this, mounting brackets are welded in advance. You can use clamps.
- Connection to the heating system. All connections must be with taps - this will make it easier to remove the electric boiler in case of repairs.
- Connecting electrical wires to the contacts of the heating element. It is better to connect through a power regulator.
- Necessarily ground the housing. This will prevent electric shock in the event of a “breakdown” of the heater insulation.
Tests
The boiler starts only at filled out heating system. When checking, special attention should be paid to the integrity of the contacts and the presence of electrical breakdown. For this you will need an indicator. If the indicator light lights up when connecting the wires, turn off the device and check where the current leakage has occurred.
Difficulties during construction
The design of an electric boiler is simple and mistakes are difficult to make. The main thing is to choose a whole heating element that will be the size of the body. All welded connections must be made professional, otherwise leaks are possible.
778 ViewsAn electric boiler can be made with your own hands from waste materials with minimal use of parts purchased in a store. Such a boiler has a number of advantages. What is made with your own hands is the easiest to repair if it breaks.
Boiler using the most affordable fuel
Electricity in Russia is available to all people, even those who live in private houses, in the most remote villages. This means that this particular type of energy can be used in any locality connected to the country’s unified energy system.
Boiler manufacturing method
Based on this calculation, the required number of heating elements is installed in a homemade electric boiler for heating. For each thermoelement, a hole of the required diameter is cut out in the top plug of its boiler. This work seems simple only at first glance. All the holes required in the top plug must be cut so that the thermocouples inserted into them are directed strictly vertically downward, or at least do not extend beyond the dimensions of the boiler body.
In order to achieve this, couplings with internal threads are inserted into the holes made and welded to the plug. If the couplings are welded unevenly, this will lead to misalignment of the thermoelements in the boiler. To avoid this, the couplings are first clamped to the plug in several places, and then leveled with a hammer, if necessary. After making sure that the couplings are level in the holes, they can be finally welded.
A hole is also cut in the bottom plug into which a coupling with internal or external thread is inserted. Subsequently, a tap will be installed on it to drain water. Now you need to cut two holes in the body of the future boiler. Through these holes, the heating system pipes will be connected to the boiler. Couplings are also inserted into them and welded.
A pipe is connected to the upper coupling; it is designed to supply hot water to the system. The lower pipe (return) is connected to the lower coupling, through which the cooled water is returned to the boiler for subsequent heating. Then the lower plug is welded to one end of the pipe, and the upper plug is welded to the other. Thermal elements are inserted into the holes in the top plug.
The best design of a homemade electric boiler
This design of a homemade electric boiler is unusual. As a rule, thermoelements in electric boilers are attached from below. This arrangement is not entirely convenient, since in an electric boiler it is the thermoelements that most often fail. That is, they most often have to be replaced. If you decide to make a heating boiler with your own hands, the designs and drawings of industrially produced boilers can be ignored.
If the thermoelements are located in the lower part of the boiler, their replacement will be associated with additional difficulties. If the heating elements are attached to the top plug, when one of them or even all of them burns out at once, the boiler does not even have to be removed from the wall or disconnected from the heating system. You will just need to use a gas wrench and unscrew the fastening nut of the burnt heating element, which is much more convenient and simpler than repairing a boiler with lower mounting elements.
It is quite possible that in the near future there will be projects for electric boilers of exactly this design. In any case, if you take this detail into account yourself, keeping the boiler system in order will be quite simple.
The main part of the electric boiler has been assembled. After this, you should connect the boiler to the electrical network and install an automatic control system for it. If the boiler power is small, less than seven kilowatts, it can also be connected to a single-phase network with a standard voltage of 220 volts.
If you plan to use a more powerful heating unit, you will need to connect to a three-phase network. But to do this, you will have to fill out a lot of documents to connect to additional energy capacities. Therefore, a more preferable option is to install two or three low-power boilers instead of one. Connecting them into one heating system will not cause much difficulty.
Electric boiler automation
To ensure automatic switching on and off of the boiler, you will need to install a thermostat on it. There are three types of thermostats:
- mechanical;
- bimetallic;
- electronic.
Mechanical thermostats are installed directly on one of the pipes of the heating system and, depending on the temperature of the coolant, can limit or, conversely, increase its movement in the system. The bimetallic thermostat is based on the principle of expansion of materials under the influence of high temperatures. In this case, the bimetallic plate is composed of two different metals, each of which reacts differently to increased temperature.
When heated, such a plate bends and the electrical circuit opens, and when it cools, the plate straightens again and the electrical circuit closes. The mechanism of action of the bimetallic thermostat is very reliable, but it has one significant drawback: heating and, especially, subsequent cooling of the bimetallic plate occurs quite slowly.
The most preferable in terms of efficiency are electronic thermostats, the operating principle of which is based on pulse-width modulation, as evidenced by numerous videos and other materials on the Internet.
Usually an electric boiler is mounted on the wall. A circulation pump is connected to its lower branch pipe, and the return line is connected to it (a pipe through which waste, cooled water enters the pump). Through the upper supply pipe, hot water enters the heat exchange system. An expansion tank is connected to the supply pipe, through which coolant is poured into the system.
2018-02-13It is quite possible to build a heating boiler in country houses that are not connected to a central gas pipeline, even on your own. In this material we will talk about how to make an electric heating boiler with your own hands. We will consider 3 available options for electric boilers - heating elements, electrode and induction.
What tools will you need?
To assemble homemade electric heating and encounter a minimum of difficulties, you must have high-quality tools at your disposal.
To work you will need:
- welding machine - it is most convenient to work with an inverter model;
- cutter – if you don’t know how to use a gas cutter, it’s better to use a plasma cutter;
- grinder - you will even need 2 models - a large one for a disk with a cross-section of 230 mm and a small one for a disk with a cross-section of 125 mm;
- electric drill;
- hammer;
- core;
- tape measure and compass.
Electric boiler on heating elements
The do-it-yourself electric boiler circuit with a heater is the easiest to implement and has been known for quite a long time.
Operating principle of a heating element boiler
The design of all household appliances in which heating elements (heating elements) are installed is the same. When the power is turned on, voltage is applied to the heating element, which gradually heats up and transfers thermal energy to the liquid located around it.

The advantages of such devices:
- a wide range of heating elements of various shapes and power;
- Possibility of use in any heating system with liquid coolants;
- insulation is installed on the boiler body, so that voltage is supplied exclusively to the heating element;
- do not require complex maintenance;
- The heating level is very easy to control, even with a minimal set of automatic controls.
Among the disadvantages of a homemade electric boiler of this type are:
- “gluttony” in electricity consumption, since heating 10 m2 of area requires 1 kW of power;
- impurities in the coolant accumulate on the heating element in the form of scale, so it needs to be cleaned approximately once a year;
- The heating element can only function in the presence of liquid; it is recommended to install an idle speed sensor with it.
The procedure for assembling a boiler with heating elements with its own rivers
Before you make an electric boiler with your own hands, you should make sure that you have a reliable power supply line. Only equipment with a power of no more than 6 kW can be connected to ordinary networks with a voltage of 220 V and a frequency of 50 Hz. If a more powerful boiler is required, it needs a three-phase wiring and a separate input.
So, we begin assembling a homemade electric heating boiler from a pipe with a cross-section of 159 mm and a wall thickness of 10 mm. This pipe will serve as the boiler body. It will require either a factory-made hemisphere with a cross-section of 159 mm and a thickness of 10 mm, or sheet metal with a thickness of 8 mm or more of a similar section.

The boiler roof, into which the heating elements will subsequently be embedded, can be made from an 8 mm thick channel.
We cut a ¾-inch coupling into the boiler dome. We will screw the drain valve into this coupling. In addition, you will need 2 pipes with a cross-section of 1 inch for inflow and return. The threads on the pipes can be made both internal and external. It all depends on which one you are more comfortable working with.
To relieve excess pressure, you need to prepare a pipe for inserting the bypass channel. You will also need 3 adapters, each of which will have a heating element for the electric boiler screwed into it. Another adapter will be needed for the temperature sensor. In addition, you will need holders for automation.
Please note that it is advisable to cut the threads on the pipes and adapters immediately.
Prepared pipes with threads, the same as on heating elements, must be immediately screwed into the adapters. This is necessary so that the threads are not damaged during welding to the arch. To mark the insertion points of the heating elements, the outer diameter of the pipe must be divided into 6 equal sectors according to the radius size. Then we draw three identical sectors strictly at an angle of 120°.
The next step is to start cutting. Having finished with the markings, using a plasma cutter we cut out holes for the pipes for the heating elements. They should be cut only along the outer contour. With all other pipes this is not of fundamental importance.

Let's start welding work. First we intercept the pipes at several points so that they do not lead. Then we check the accuracy of the location, if necessary, lightly tap with a hammer, and then make a continuous seam. It is important that the adapters for heating elements in an electric boiler for heating with your own hands protrude 1 cm above the surface of the boiler roof.
Let's start cutting out the vault from the channel. In its center we make a hole for the air valve pipe, after which we weld the pipe itself. We make a hole on the side for the temperature sensor and also weld a pipe under it.
All protrusions, burrs and welding residues must be thoroughly cleaned using a grinder. The inner surface of the arch platform must be perfectly flat. The pipes for installing heating elements will protrude only 1 cm from the outside.
We got a fairly powerful electric boiler with our own hands with 3 heating elements. If you need a simpler unit, using the same principle it can be assembled with 1 or 2 heating elements.
Assembling a heating boiler on electrodes
Devices of this type have become actively used only in the last 10-15 years. These are more technologically advanced devices compared to heating elements.
Design
In electronic electric boilers, the liquid plays the role of a heating element. A self-assembled electric boiler of this type is a metal casing, inside of which there is an insulated steel electrode.

0 is supplied to the housing, and phase is supplied to the electrode. When voltage is applied, water ions begin to vibrate with a frequency of 50 hertz. In this case, the liquid gradually heats up. Due to this property, such boilers are also called ion boilers.
The dimensions of electrode boilers are small. They can be made from a pipe with a cross-section of up to 320 mm and a length of up to 60 cm. However, an electric boiler for heating a house with your own hands can be made much smaller.
Advantages:
- small dimensions, thanks to which the ion boiler can be placed even in a small apartment;
- the absence of the so-called “dry running”, which guarantees the serviceability of the boiler, since without liquid inside it will not work;
- resistance to voltage surges;
- high heating and cooling speed, which means ease of adjustment;
- efficiency in energy consumption compared to devices using heating elements.

Among the disadvantages of such boilers are the following:
- An important condition for the effective functioning of an electrode boiler is the level of thermal conductivity and the quality of the coolant;
- the device must be reliably grounded, since there is a high risk of electric shock;
- It is important to exclude the possibility of air getting inside the system, otherwise the electrodes will become unusable due to corrosion.
Instructions for assembling a homemade electrode boiler
As a body for an electric heating boiler with our own hands, we use a pipe with an internal cross-section of about 50 mm and a length of 40 cm. In addition, you will need a solid rod with a diameter of 20 mm and a length of 30 cm, as well as two adapters with cut internal threads. At the end of the rod we drill a blind hole with a thread for a Ø10 mm bolt.
We prepare the pipes. We will weld 1 at the end of the pipe, and the other at the side. To ensure that the side pipe fits perfectly to the pipe, it is trimmed with a grinder and then sanded with a round file.
We cut holes for the pipes. If you don’t have a cutter, you can drill many small holes around the circumference. The work is brought to perfection with a needle file and a round file. The hole for the side pipe must be located 10-15 mm from the edge of the pipe.
The next step is to weld the pipes to the pipe. To prevent them from being led away, they first make spot welding in several places, and then apply a continuous seam.
We prepare the platform for the electric boiler. To do this, you can take a sheet of fiberglass 2 cm thick and cut a piece of 120x120 mm using a hacksaw. Then in this platform you need to drill one hole in the center, and four around the perimeter. The cross-section of the holes should be 10-12 mm.

Fastenings of the boiler body will be passed through the holes along the perimeter, and the central hole is intended for fixing the steel electrode.
We proceed to fixing the casing for the boiler to the platform. To ensure a secure fit, four Ø12 mm nuts can be welded on the body on 4 sides. Bolts Ø10 mm will easily pass through them.
Such nuts need to be welded with a slight indentation from the platform. To ensure this, you need to screw nuts of appropriate size onto the bolts, thread them into the wide nuts, and secure them from below again with smaller ones. This will make welding work easier.
At the last stage we perform the final assembly of the boiler. To do this, cut out a rubber gasket with a cross-section slightly larger than the outer diameter of the boiler. We make a hole in its central part and thread an electrode through it. Then we install the body on the platform and screw it on.
Induction boilers
Among all the options for assembling heating with an electric boiler with your own hands, making an induction-type model is the most innovative.
Working principle of electric induction boiler
If we omit the details, then the operation of an induction boiler is based on heating the coolant through a magnetic field.
Among the advantages of such units:
- high efficiency;
- safety;
- possibility of using any coolant;
- no scale.

- high cost of factory boilers;
- complexity of the structure of the automatic control unit. Without preparation it will be difficult to assemble it.
Instructions for assembling a homemade induction boiler
It is worth noting that often the instructions on how to make an induction-type electric boiler are so complex and contain such labor-intensive drawings that self-assembly of the equipment looks rather doubtful. However, we found a non-standard solution.
Before you make an electric boiler for heating yourself, you will need to purchase an induction furnace with a power of 2.4 kW and 3 meters of profiled pipes Ø25x50 mm with walls 2.5 mm thick.
If we consider how this design will work, then first we assemble a flat container from the profile - liquid will move along it. And then we fix the induction stove to the pipe and connect it to the network. Everything together will look something like a saucepan on the stove.

Pipe cutting must be done as accurately as possible. You will need several 400 mm pieces, carefully cleaned of burrs at the ends.
Since the liquid inside such a boiler will move like a snake, it is advisable to take an even number of pieces of pipe so that the inlet and outlet holes are located on the same side - this makes it more convenient to connect them to the heating circuit.
Since the profile pipes are not perfectly straight, they must first be joined with blunt edges to sharp ones and numbered so as not to be confused later.
At the next stage, the joints between the pipes need to be welded. We lay the structure on a flat surface, tighten it with a clamp and weld it. First we do spot welding so that the structure does not move, and then we make permanent seams.
Now we need to close the end part of our container. For this we use a steel strip cut from profiled pipes. We perform welding using a similar method - first spot welding and then complete welding.

We also weld the strip on the opposite side, not forgetting to install the inlet and return pipes on the outer pipes. To ensure maximum contact area between the container and the stove, all seams must be thoroughly cleaned.
So that our boiler can be hung on the wall, 2 corners need to be welded on its back, in which the induction stove will be placed, as well as loops for hanging.
The last stage of work is painting. You can use heat-resistant paint. This completes the assembly work. You can hang the boiler and connect it to the heating and electrical network.
When purchasing an induction furnace, make sure that it is designed for continuous operation. Otherwise, the system will need to be restarted every 2 hours.
Results
Each of the listed models is fully functional and reliable. Everyone will make their own choice in favor of any of them. The main thing is to pay attention to the work and, in case of difficulties, consult with knowledgeable people.
We recently told you about how to do it yourself. However, in the example we considered a water heater from the manufacturer - compact, efficient, but expensive. To make a similar device yourself does not require much time, much less money. The only condition is that you must be “friends” with the welding machine. We will tell you further about how to make an electrode boiler with your own hands from available materials!
Briefly about the principle of operation
First of all, we will tell you how this type of water heater for the heating system works. The principle of operation is quite simple - the coolant (in our case, clean water) enters a container in which an electrode is installed - a thick metal rod attached to one of the ends of the container. A phase is connected to the electrode, and a neutral conductor is connected to the outer part of the housing. When the device is connected to a 220 Volt network with a frequency of 50 Hz, the coolant begins to move chaotically from the anode to the cathode, as a result of which the water ions are heated. That is why electrode boilers can also be called ionic. As you can see, the principle of operation is really not complicated, although at the same time the efficiency of the system is 96-98%, which is a very high figure.
A simple homemade product using improvised materials
So, first of all, we will provide you with step-by-step instructions for creating an electrode heating boiler at home, having the simplest spare parts on hand - a metal pipe and an electrode, as shown in the photo: 
All you need to make is:
- welding machine;
- pipe with a diameter of no more than 10 cm and a length of up to 25 cm;
- electrode (a 10-12 mm metal rod is suitable);
- tee of suitable diameter;
- a coupling that will connect to the heating system;
- insulator for the electrode and terminals (zero, grounding);
The assembly process is quite simple and consists of the following steps:

That's the whole manufacturing technology. A drawing of a simple electrode boiler should look something like this: 
How profitable is such a system?
Master class in 5 parts
Well, if you are proficient with a welding machine, we recommend making an electrode boiler with your own hands, following all the tips provided in the video course below. Such a homemade product will be safer, more reliable and effective!
Part 1 - Overview of the finished system
Part 2 - Housing Assembly